
6 min read
Disclosure: As an Amazon Associate and eBay Partner Network publisher, we earn from qualifying purchases. This doesn’t affect what we recommend or how we describe it.
How do you position an aquarium heater so it doesn’t accidentally cook your fish—or leave your tank too cold in winter? This is the question every new aquarist faces when setting up a planted freshwater tank. The answer is less obvious than it seems: it’s not just about sticking the heater in the water and plugging it in. Proper installation affects everything from plant health to algae outbreaks and fish stress. Here’s what you need to know to get it right the first time, avoid costly mistakes, and keep your aquascape thriving.
What most buying guides get wrong about heater installation
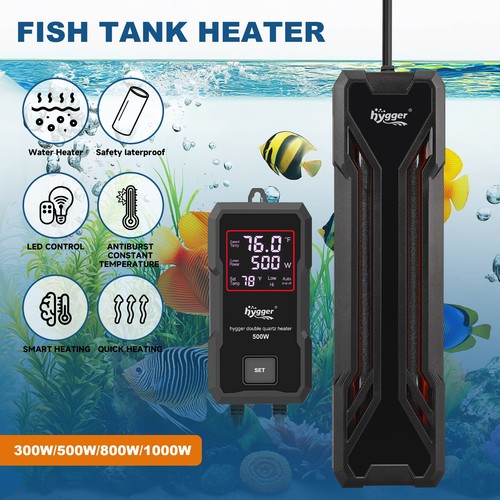
Most guides gloss over how heater type and placement interact with tank size, flow, and plant layout. In practice, the wrong heater—or the right heater installed poorly—can create cold or hot spots, cook delicate plants, or even crack the glass. For home aquascapers, the most common heater types are submersible glass, inline external, and preset compact models. Each has unique strengths and quirks that affect installation.
It’s not just about wattage. For example, a 100-watt submersible heater might be ideal for a 20-gallon tank in a warm home, but hopeless in a drafty room or for a high-tech planted setup that needs stable CO2 and temperature. Inline heaters are great for minimalist aquascapes but demand canister filters and careful plumbing. Preset heaters are beginner-friendly but often lack fine temperature control. Understanding these differences is key before you even unbox your gear.
Comparison table: heater types and installation impact
| Type | Typical Wattage Range | Size (L x W x H) | Temperature Control | Suitable Tank Size |
|---|---|---|---|---|
| Submersible Glass | 25–300 W | 20–35 x 2.5 x 2.5 cm | Adjustable (18–34°C) | 10–75 gal |
| Inline External | 200–500 W | 30–35 x 7 x 7 cm | Adjustable (20–32°C) | 40–150 gal |
| Preset Compact | 10–100 W | 10–18 x 2.5 x 2.5 cm | Fixed (24–26°C) | 2–20 gal |
| Undergravel | 12–30 W/m | Flexible cable | Thermostat (20–30°C) | 20–60 gal |
How to install an aquarium heater: step-by-step guide
-
Select the right wattage and type
Calculate roughly 3–5 watts per gallon for most home tanks. For a 20-gallon, aim for a 75–100 W heater. Choose submersible for simplicity, inline for external setups, or preset for nano tanks. -
Inspect for damage and test in water
Check the heater for cracks or condensation inside the tube. Place it in a bucket of water and plug it in for 10–15 minutes to ensure it heats up and the indicator light works. Never test a heater dry. -
Install in the tank (or filter line)
For submersible models, place heater horizontally or at a 45° angle near the filter outflow to maximize circulation. Use included suction cups and keep it 2–3 cm from the substrate and glass. For inline models, cut the filter return hose, attach heater securely, and check for leaks before powering up. -
Set the temperature and wait before plugging in
Adjust the thermostat to your target (commonly 24–26°C for most tropical setups). Let the heater acclimate in the tank for 20–30 minutes before plugging it in to avoid thermal shock. -
Monitor temperature stability
Use a reliable aquarium thermometer (digital or stick-on) placed at the opposite end of the tank. Check temperature twice daily for the first week, making small adjustments if needed. -
Secure the cord and ensure safety
Create a drip loop in the power cord to prevent water from running down into the outlet. Never plug in or remove the heater while your hands are wet or while the heater is out of water.
The spec almost nobody talks about: circulation patterns
Temperature uniformity is the hidden challenge in planted tanks. Even a 200-watt heater can leave dead zones if water movement is poor. Position your heater near the filter outflow or circulation pump, not behind dense hardscape or in a corner. In tanks over 36″ long, consider two smaller heaters (e.g., dual 75 W for a 40-gallon) at opposite ends for even distribution.
For rimless or minimalist aquascapes, inline heaters keep hardware out of sight but demand strong pump flow (at least 200 GPH for 200–300 W units) to avoid temperature lag. Undergravel cables are rarely used outside advanced planted tanks but can help root health by gentle substrate warming—though they’re tricky to install after the tank is planted.
See today’s deals on submersible and inline heaters that fit your tank’s flow setup.Related Guides
- How to Set Your Aquarium Heater Temperature: A Step-by-Step Guide
- Aquarium Air Stones That Actually Work: Our Top Picks for Healthy Tanks
- Aquarium Canister Filters That Actually Work: Top Picks for 2026
- Our guide to Aquarium Circulation Pumps That Are Actually Worth Buying
- Our guide to Aquarium Heaters With Guards That Are Worth Buying
- Our guide to Aquarium Plant Anchors That Actually Work: Our Top Recommendations
- Browse all Aquarium Tanks →
Quick decision tree
- If your tank is under 20 gallons: a preset compact heater is easiest and fits most nano tanks.
- If you want all gear out of sight: inline external heaters work with canister filters for a clean look.
- If budget is your main concern: submersible glass heaters are reliable and affordable for almost all sizes.
- If you have complex hardscape or dense planting: use two smaller heaters for even temperature.
- If you need to heat the substrate: undergravel cables suit advanced planted setups, but require planning before planting.
FAQ: troubleshooting and real-world heater concerns
How long does an aquarium heater last before replacement?
Most submersible aquarium heaters last 2–5 years with regular use. Inline models and undergravel cables can last longer (up to 6–8 years), while cheap compacts may fail in under 2 years. Replace any heater immediately if you see condensation, cracks, or erratic heating.
Two heaters vs. one: which is better for a 40-gallon planted tank?
Using two 75–100 W heaters at opposite ends provides more even heat distribution and redundancy if one fails. This is especially helpful in long tanks or those with dense hardscape that blocks flow. Single large heaters can work but may create hot or cold spots.
How many watts do I need for a 75-gallon aquarium in a cool room?
For a 75-gallon tank in a room below 20°C (68°F), aim for 250–300 watts total. Two 150 W heaters or one 300 W model are common choices. Adjust upward if the room drops below 16°C (60°F) in winter.
What’s the most common point of failure with aquarium heaters?
Glass tube heaters are prone to cracking if removed from water while hot. Thermostats can also stick, causing dangerous overheating. Always unplug before water changes, and check heater function regularly to catch early signs of failure.
Are heaters safe with sensitive plants or shrimp?
Yes, but avoid placing heaters directly against delicate plants or mosses, as localized heat can cause melting. Use lower wattage models for shrimp tanks, and ensure stable temperature (±1°C) to prevent stress or molting issues.
What should I do if my heater is too large for my tank?
A heater that’s physically too big can be mounted at an angle or horizontally, as long as it’s fully submerged and not touching substrate or decor. If wattage is excessive, use a reliable external thermostat or swap for a lower wattage model to avoid overheating.
Further reading and reference standards
For more on aquarium heating safety and standards, see the UL (Underwriters Laboratories) guidelines for electrical aquarium equipment. For temperature and care recommendations for specific fish and plants, consult the FishBase database for up-to-date species profiles and requirements.


Last updated: June 2026 · How we research and evaluate